Assignments in eClass:
By default, your generic class contains pre-made assignments, including test, quiz, and a making period grade (each of these assignment categories is weighted at 100% [displayed as 100.00 or 1.000 depending on the window being viewed]).
In the most basic use of eClass, you can just assign a point total to the marking period itself (default at 100 pts), allowing you to enter the earned points for the entire marking period in one place, exactly as it was performed in the now-retired “Marks” program. This method assumes you use another method or program to arrive at the total number of points earned for each student, in each marking period (such as an Excel spreadsheet, or paper grade book).
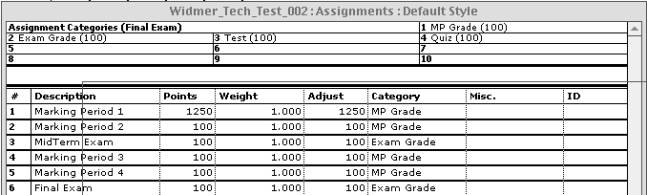
Example below shows one assignment called Marking Period 1, worth 1250 points for this entire reporting period. If a student earns 1200 points throughout the marking period she/he would receive a grade of 96%.
Adding your own Assignments:
To customize your eClass experience, and add assignments beyond the basics above, head up to the Windows menu and select Assignments. Here you can add the assignments given to your class for the corresponding reporting period/marking period. This will allow you to use eClass to store and calculate grades without using another tool (such as an Excel spreadsheet) to gather data before entering a final marking period score.
Each reporting period (Marking Period 1-4, Mid Term, Final) is separated by a thick black horizontal line in this Assignments view. (In addition, when viewing the Scores window, each reporting period is separated by a thick black vertical line). Keep this in mind when adding assignments, as you must insert the assignment into the appropriate reporting period (you can easily copy and paste assignments between marking periods, see the online help for more info).
If you’d like to start adding additional assignments to your marking periods, the first thing to do is to rename the existing assignments, such as Marking Period 1, and change the assignment category. In order to keep your grade calculations correct, you should not leave in the overall Marking Period 1, 2, etc. assignment AND individual assignments in the same reporting period…pick one or the other, not both.
For example, if you’d like to start adding separate assignments to Marking Period 2, you would first rename the existing assignment called Marking Period 2 to something else, such as Quiz#1a. Modify the points available, and leave the weight at the current 1.0 value. Finally, “control” click on the category field in this current row, to select the Quiz category.
To add additional assignments for this Marking Period, you will need to add additional rows for insertion of your description, points, etc.
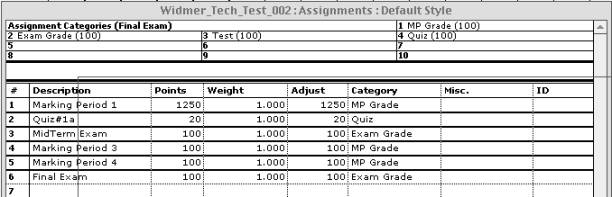
To insert a new row, highlight the row below your intended target (yes, this is a bit unusual), then head up to the Edit menu, and select Insert Row. Repeat for each new assignment in this reporting period. Example: to add another row to the marking period 2 area, you would highlight the marking period 3 row, and insert a new row, which will appear in the row above, in the marking period 2 area.
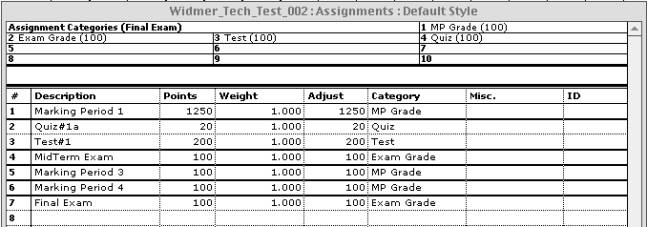
Now, just rename this "New Assignment” to something else, such as Test#1, assign points, and control click on the category field to select the appropriate category. See example below, with a new assignment named Test#1, worth 200 points, in the category of Test added to the Marking Period 2 reporting period.
Adding Scores for your Assignments:
Head up to the Windows menu, and select Scores. You can now select a student from the list, and add the appropriate grades/scores for your students. If you are not seeing the correct marking period in the upper left of your Scores window, check out the eClass Tips note on “Changing the displayed Marking Period, Midterm or Final in the Scores Window”, available here.
Entering Assignments between existing entries:
If you have an assignment to be inserted between two others you've already entered, you can do the following:
1) Place your cursor in the row just below where you want the new row to be inserted.
2) Select Insert Row from in the Edit menu. A new, blank row will be inserted just above the row containing the cursor. The row containing the cursor, and all rows below it, will be moved down to make room for the new row, and any scores you've assigned to your students will be moved accordingly.
3) Enter your data directly into the new row.
4) Don’t forget to save your class file.
How do I enter assignments 'in advance'?
1) In the Assignments window, enter '0' into the 'Points' column for each assignment you enter in advance, and change it from '0' to the desired value later, when you finally enter scores for that assignment.
Created: 9/5/03
Last Modified: 9/5/03 3:52pm